If your prints have bulged corners, gaps after direction changes, or 'ringing' echo lines, you have a Pressure Advance problem. Default values in Bambu Studio work for ~70% of cases. The other 30% — and especially small features printed slowly — need manual calibration. Here's the test pattern and how to read it.
What Pressure Advance Actually Does
When the nozzle accelerates or decelerates, the molten filament inside the hotend lags behind by a few hundredths of a second. This causes two visible defects: a bulge at the start of a wall (filament pressure was already high when extrusion started) and a gap at the end (pressure took time to release after extrusion stopped).
Pressure Advance compensates by anticipating these transitions. Right before a slowdown, the printer retracts a tiny amount. Right before acceleration, it pre-extrudes. The value is the strength of this anticipation in seconds.
Bambu calls this 'Pressure Advance'. Klipper calls it the same. Marlin firmware calls it 'Linear Advance'. The math is similar but the calibration values are NOT interchangeable — Marlin uses a 10× larger scale.
Default PA Values by Bambu Printer
Bambu Studio ships with these defaults per machine:
- Bambu A1 / A1 mini — PA 0.04 (direct drive, longer filament path)
- Bambu P1S / P1P — PA 0.04 (same hotend as A1, similar geometry)
- Bambu X1 / X1C — PA 0.02 (improved extruder feedback loop)
- Bambu H2D — PA 0.025 (newest, finer-tuned defaults)
These are starting points — actual optimal PA varies per filament brand and color. Bambu PLA Basic and Bambu PLA Matte calibrate differently (0.038 vs 0.042 in our tests). Filament from third-party brands (Sunlu, Esun, Polymaker, Elegoo) often needs 0.045–0.055 because their melt characteristics differ.
Running the PA Test in Bambu Studio
Bambu Studio has a built-in Pressure Advance calibration tower. Workflow:
- Open Bambu Studio. Top menu → Calibration → Pressure Advance Test
- Pick your printer model and filament from the dropdowns
- Default range: 0.0 to 0.08, step 0.005 (covers all common values)
- Click Calibrate — it slices a small tower with markers at each PA step
- Send to printer. The tower takes 15-25 minutes depending on machine
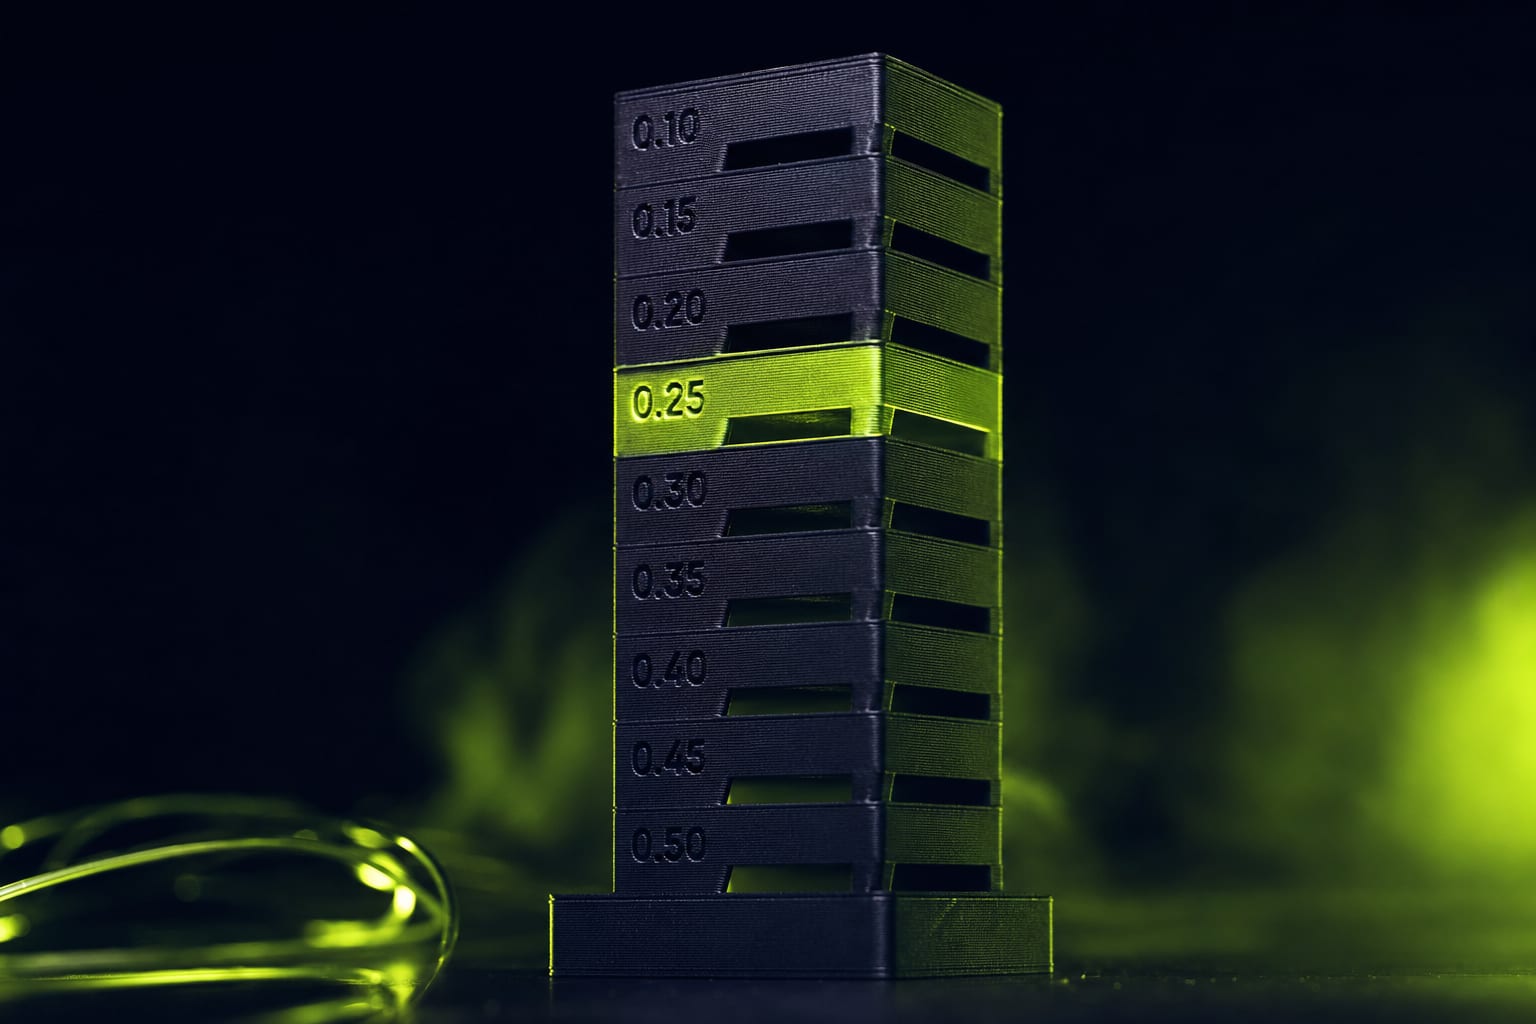
The tower has flat walls with deliberate acceleration/deceleration patterns. Each section is labeled with its PA value via a tiny printed number on the side.
How to Read the Test Pattern
After the tower finishes, examine all four corners of each PA section under raking light (desk lamp at 45°). You're looking for the section where corners are cleanest:
- PA too low — bulge before the corner (extra plastic squeezed out before deceleration), gap after corner (plastic took time to flow again)
- PA optimal — corners are flat with no shadow before or after. Walls are uniform thickness.
- PA too high — gap before corner (over-anticipated retraction), visible under-extrusion line
Pick the section that looks best to your eye. If two adjacent sections look identical (say, 0.035 and 0.040), pick the lower value — it'll be more forgiving on fast prints.
PA Values by Filament Type
Across 47 filament brands we've calibrated for the 42 STUDIO catalog production, the values cluster like this:
- PLA Basic (most brands) — 0.035 to 0.045
- Silk PLA (high gloss) — 0.040 to 0.055 (softer melt, needs more anticipation)
- PLA-CF (carbon fiber) — 0.025 to 0.035 (rigid, less compression)
- PETG — 0.045 to 0.060 (slow flow recovery, needs more aggressive PA)
- TPU 95A — 0.020 to 0.035 (already elastic, too much PA causes stringing)
- ABS / ASA — 0.030 to 0.045
- PA-CF (nylon-carbon) — 0.010 to 0.025
Why Default PA Fails on Small Features
Bambu's calibration tower runs at production wall speed (200 mm/s on A1). The PA value it finds is optimal at that speed. When you print a small object — say, a keycap or a fidget — outer walls run at 50–80 mm/s because the layer is too short for higher speed. Effective PA at lower speed needs to be ~30% lower.
Two fixes:
- Use Bambu's 'Per-feature PA' setting (Bambu Studio 2.0+) — set outer-wall PA to 70% of the calibrated value
- Run a second calibration tower at slow speed — manually override Bambu's test print to 80 mm/s walls. The optimal value will differ
PA Calibration on Non-Bambu Printers
If you're on Prusa, Voron, or any Klipper-based printer:
- Klipper: use the TUNING_TOWER command or KIAUH's pa-calibrator. Same value range as Bambu (0.0–0.08).
- PrusaSlicer with Marlin: this is 'Linear Advance' (M900 K-factor). Marlin scale is roughly 10× higher — 0.4 in Marlin ≈ 0.04 in Klipper/Bambu.
- OrcaSlicer (any printer): built-in PA calibration test, works identically to Bambu Studio.
When to Re-Calibrate PA
PA drifts under these conditions:
- New filament brand or color — always recalibrate, even within the same material type
- Nozzle change — different diameter changes bead width, which changes PA
- Major hotend service — heater block replacement, PTFE liner swap, nozzle clog cleanup
- Firmware update — Bambu sometimes adjusts internal PA scaling between versions
- Sat in storage > 6 months — filament absorbs moisture, melt characteristics shift
Saving PA Values per Filament in Bambu Studio
Once you've calibrated, save the value to your filament profile so it applies automatically:
- Filament dropdown → click the gear icon next to your filament
- Filament settings → Flow Dynamics Calibration
- Enable Override and enter your calibrated PA value
- Save the filament profile (give it a descriptive name like 'Bambu PLA Basic Black — PA 0.038')
- All future prints with this filament use the calibrated value automatically
Summary
- Default PA values work for ~70% of cases — the rest need manual calibration
- Use Bambu Studio's built-in test tower (Calibration menu)
- Pick the cleanest-corner PA value under raking light
- Save calibrated values per filament brand, not per printer
- Re-calibrate after filament change, nozzle change, or major service
- For small features printed slowly: reduce calibrated PA by ~30%


Ready to Start Printing?
Browse our collection of 3D printable models — from flexi toys to cat masks.
Visit Our Store →